Introduction
If you’ve ever cracked a screen on a traditional laptop, you know the sinking feeling — an expensive repair bill or, worse, a full replacement. That frustration is exactly why modular laptops exist. The ability to repair common hardware issues yourself, without voiding a warranty or hunting down a certified technician, is one of the most compelling reasons to invest in platforms like the Framework Laptop.
This guide walks you through the most frequent hardware problems modular laptop owners encounter and gives you clear, step-by-step instructions to fix them. Whether you’re swapping a faulty keyboard, replacing a cracked display, or upgrading aging RAM, this is the resource you’ve been looking for.
Table of Contents
What Makes Modular Laptops Different?
Modular laptops are engineered with repairability as a core design principle. Unlike traditional ultrabooks — where components are soldered to the motherboard or glued into unibody chassis — modular systems use standardized screws, connectors, and interchangeable modules.
Key advantages include:
- User-replaceable components (RAM, SSD, battery, display, keyboard)
- Publicly available repair guides and spare parts marketplaces
- Compatibility with common tools (Torx T5, Phillips #0)
- No proprietary adhesive barriers in most assemblies
The most prominent name in this space is Framework, though other brands like Fairphone (for smartphones) and select business-class ThinkPads share similar repair-forward philosophies.
How to Repair Common Hardware Issues Step by Step
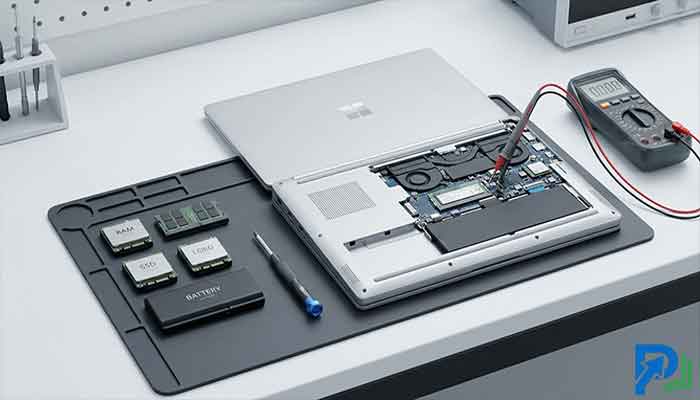
Tools You’ll Need Before You Start
Before touching any component, gather these essentials:
- Torx T5 screwdriver — used on most Framework screws
- Phillips #0 screwdriver — for internal module screws
- Anti-static wrist strap — protects sensitive components from electrostatic discharge
- Spudger or plastic pry tool — for gently separating panels
- Tweezers — for handling small connectors
- Clean, lint-free cloth — for screen and surface cleaning
Never use metal pry tools on plastic components. One slip can crack a bezel or damage a ribbon cable connector permanently.
Repairing Framework Laptops — The Modular Standard
The Framework Laptop has become the reference design for consumer modular hardware. Its Input Cover, Expansion Cards, display assembly, and mainboard are all sold separately through the Framework Marketplace.
When repairing Framework laptops, always:
- Power down the device fully and disconnect the battery before any internal work
- Follow the official iFixit Framework repair guides for your exact model
- Use the captive screws as designed — they’re engineered not to fall out, which makes reassembly significantly easier
Fix 1: Replacing a Broken or Unresponsive Keyboard
A keyboard that registers ghost inputs, has stuck keys, or fails entirely is one of the most common issues modular laptop users encounter.
Steps to replace the keyboard module (Framework example):
- Shut down your laptop and disconnect the power cable.
- Flip the laptop over and use your T5 screwdriver to loosen the five captive screws on the bottom cover.
- Carefully lift the bottom cover starting from the back edge using a spudger.
- Locate the keyboard cable — a flat ribbon connector attached to the motherboard.
- Gently unlatch the ZIF (zero insertion force) connector and pull the ribbon cable free.
- Disconnect and remove the old keyboard from the Input Cover.
- Seat the new keyboard, reconnect the ribbon cable, and latch the ZIF connector.
- Replace the bottom cover and tighten the captive screws in a cross pattern.
Common mistakes to avoid:
- Forcing the ZIF latch — it should flip up with minimal pressure
- Over-tightening captive screws (finger-tight plus a quarter turn is sufficient)
- Forgetting to reseat the touchpad cable if you disconnected it
Fix 2: Fixing a Modular Screen — Display Assembly Replacement
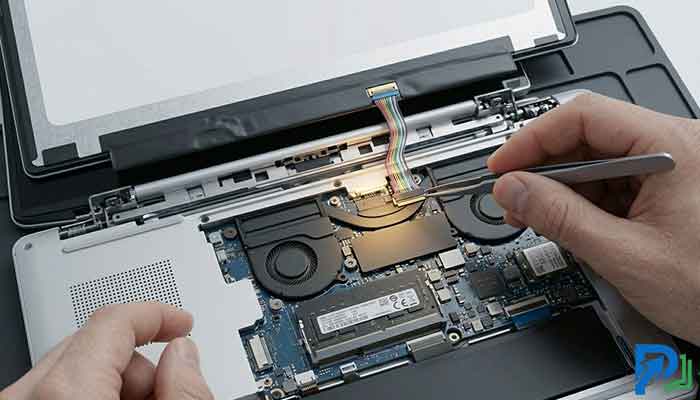
A cracked, flickering, or dead display is intimidating to fix on traditional laptops. On modular systems, it’s a manageable afternoon project.
Symptoms that indicate display replacement:
- Physical cracks or shattered LCD panel
- Persistent flickering even with updated drivers
- Dead pixels across a significant area of the screen
- Display goes black but external monitor works fine
Steps to replace the display:
- Power down the device and remove the battery connection (refer to Fix 1 steps 1–3).
- Open the lid to a 90-degree angle and carefully pry the display bezel starting from the bottom corners.
- Remove the bezel screws (typically Phillips #0) that secure the display panel.
- Carefully lift the display panel — note the eDP (embedded DisplayPort) cable running from the panel to the hinge area.
- Disconnect the eDP cable by gently pulling the connector straight back (do not yank at an angle).
- Remove the old panel and set the new one in place.
- Reconnect the eDP cable until it clicks securely.
- Replace screws, snap the bezel back on, and test before final assembly.
Fix 3: Upgrading Modular Parts — RAM and SSD
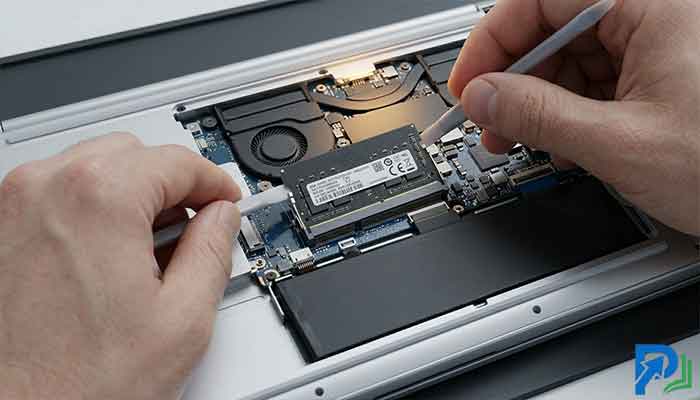
One of the biggest benefits of owning a modular laptop is the freedom to upgrade modular parts as your workload grows — without buying a new machine.
Upgrading RAM
Most modular laptops use standard SO-DIMM DDR4 or DDR5 slots. Check your model’s specifications before purchasing.
Steps:
- Open the bottom cover (see Fix 1, steps 1–3).
- Locate the SO-DIMM slots — they’re usually labeled and color-coded.
- Press the side clips outward simultaneously; the RAM stick will pop up at a 30-degree angle.
- Slide the old stick out and insert the new one at the same angle, then press it flat until the clips click.
Upgrading the SSD
- After opening the bottom cover, locate the M.2 slot (typically a single screw holds the drive in place).
- Remove the retaining screw and slide the old SSD out at a 30-degree angle.
- Insert the new SSD, press flat, and replace the retaining screw.
- Reinstall your OS from a USB bootable drive, or restore from a backup.
Pro tip: Before swapping the SSD, create a full system image using Macrium Reflect (Windows) or Clonezilla (Linux) to avoid reinstalling from scratch.
Fix 4: Replacing a Failing Battery
Battery degradation is inevitable — but on a modular laptop, it’s a $50–$80 fix rather than a full device replacement.
Signs your battery needs replacing:
- Capacity below 75–80% of original (check via battery report:
powercfg /batteryreporton Windows) - Swollen or physically deformed casing (treat this as urgent — swollen batteries are a fire risk)
- Sudden shutdowns at 20–30% charge
Replacement steps:
- Power off the device completely.
- Open the bottom cover and locate the battery connector on the motherboard.
- Gently disconnect the battery cable (pull straight up, never sideways).
- Remove the screws or adhesive strips securing the battery.
- Lift the battery out carefully — do not bend or puncture it.
- Seat the new battery, reconnect the cable, and reassemble.
Safety note: Never use a knife or sharp tool near a lithium battery. Puncturing a lithium cell can cause thermal runaway.
Fix 5: Diagnosing and Replacing Expansion Cards
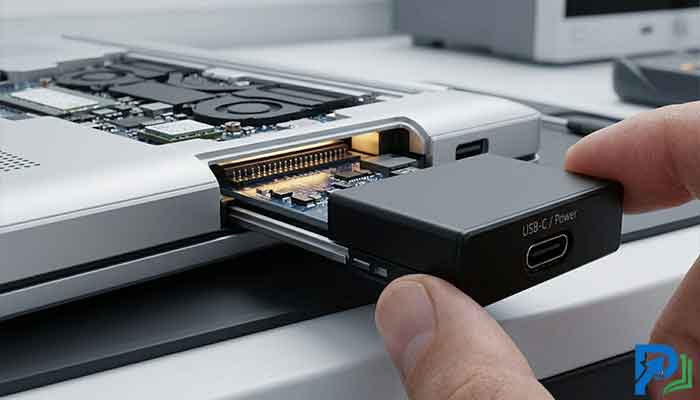
Framework’s Expansion Card system lets users swap USB-A, USB-C, HDMI, DisplayPort, microSD, and even storage modules in seconds — no tools required.
If an Expansion Card stops working:
- Remove the card and inspect the gold connector fingers for debris or corrosion.
- Use a dry cotton swab to gently clean the contacts.
- Reinsert the card — it should seat with a firm click.
- If it still doesn’t work, test in a different slot to isolate whether the issue is the card or the chassis connector.
- Order a replacement card directly from the Framework Marketplace.
Read More: Neural Link Privacy: How to Protect Your Brain Data
DIY Laptop Hardware: Safety and Best Practices
Handling DIY laptop hardware safely is non-negotiable. Follow these best practices every time:
- Always disconnect power before opening the chassis — even a brief short can fry a motherboard.
- Ground yourself before touching internal components using an anti-static strap or by touching a grounded metal object.
- Document your disassembly with photos — it’s easy to forget screw positions or cable routing.
- Never force connectors — if something resists, double-check you’re removing the right latch or clip.
- Store screws by location — use a magnetic project mat or small labeled cups to track which screws belong where.
Eco-Friendly Repair: Why Modular Laptops Matter for the Planet
Beyond the cost savings, modular laptop repair is a meaningful eco-friendly repair choice. Consumer electronics are one of the fastest-growing waste streams globally, and most of that waste comes from devices discarded due to a single failed component.
By replacing only what’s broken, you:
- Extend device lifespan by 3–5 years on average
- Reduce CO₂ emissions associated with manufacturing a new device (approximately 300–400 kg per laptop)
- Minimize e-waste — lithium batteries, screens, and circuit boards contain hazardous materials that harm ecosystems when improperly disposed of
- Support the Right to Repair movement, which advocates for consumer access to parts, tools, and repair documentation
The Repair Association and iFixit actively track legislative progress on Right to Repair laws across the US — progress that modular laptop manufacturers like Framework are directly enabling.
Conclusion
Modular laptops have fundamentally changed what it means to own and maintain a personal computer. The ability to repair common hardware issues — from a dead keyboard to a cracked display to a worn-out battery — without professional help or proprietary tools is no longer a hobbyist novelty. It’s a practical, cost-effective, and environmentally responsible approach to computing.
Whether you’re repairing Framework laptops for the first time or you’ve been upgrading modular parts for years, the skills covered in this guide will serve you for the life of your device. Start with the simpler fixes (Expansion Cards, RAM), build confidence, and work your way up to display and battery replacements. Your wallet — and the planet — will thank you.